The bridge is one of the fundamental elements in gymnastics, serving as a cornerstone for developing flexibility, strength, and balance. Whether you’re a beginner or aiming to perfect your technique, mastering the bridge is essential for advancing in gymnastics. In this comprehensive guide, we’ll break down the bridge into manageable steps, offering tips and exercises to help you achieve your goals.

Gymnasts: @mayaistumbling & @gymnast_sky_grace
How to Do a Bridge Step-By-Step
The easiest way to get into a bridge is to start by laying down.
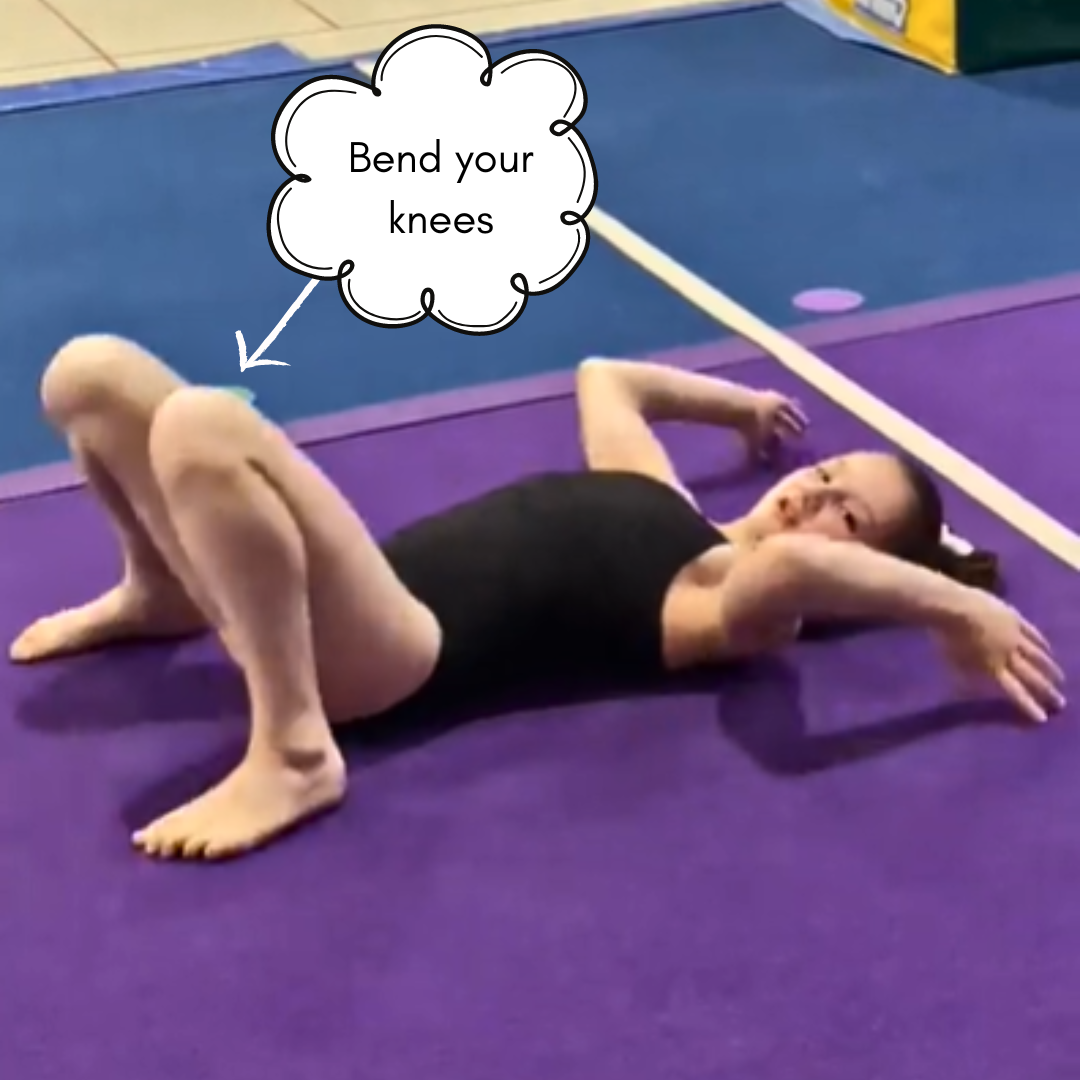 1. Bend your knees with your feet flat on the ground slightly wider than shoulder width apart
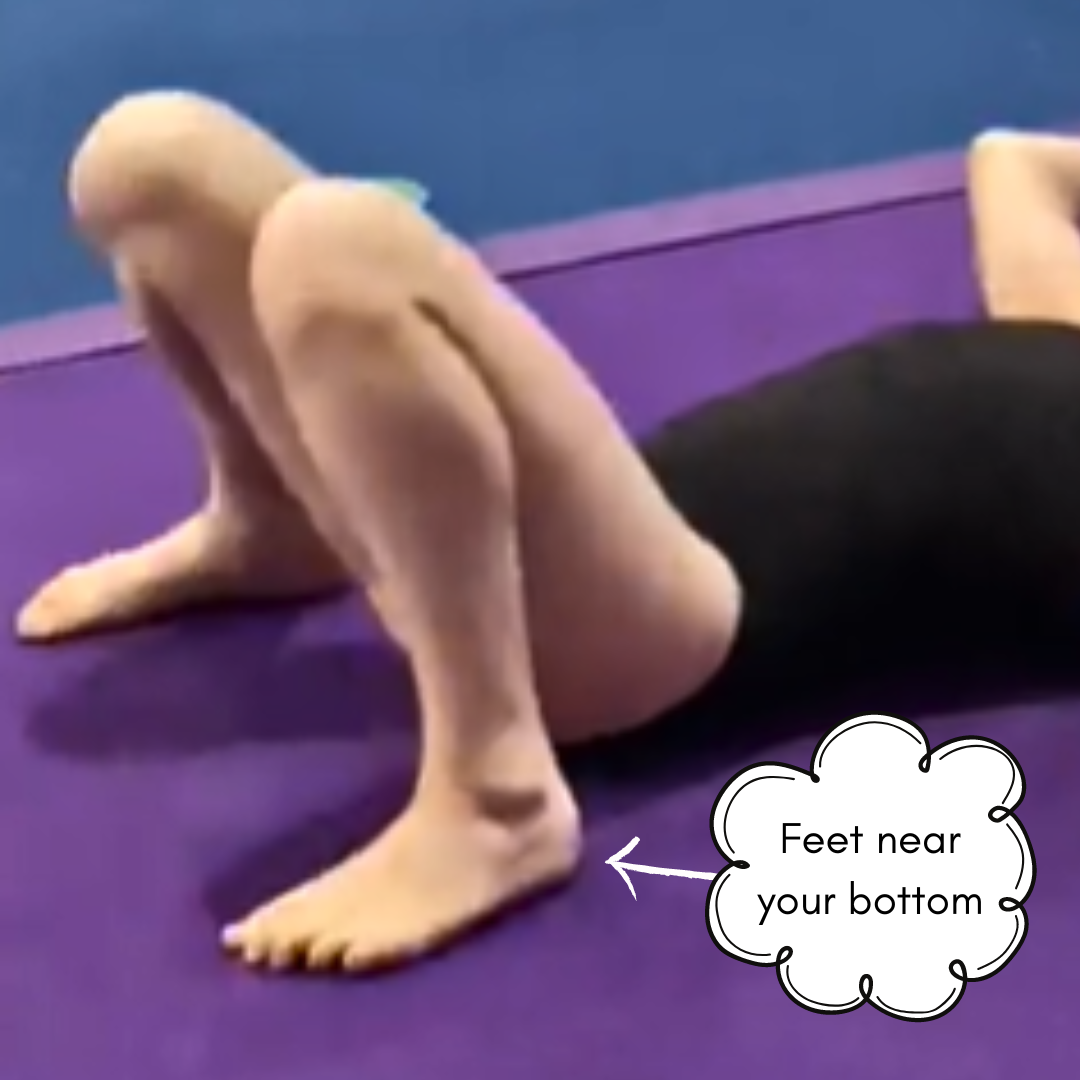 2. Walk your feet up near your buttocks
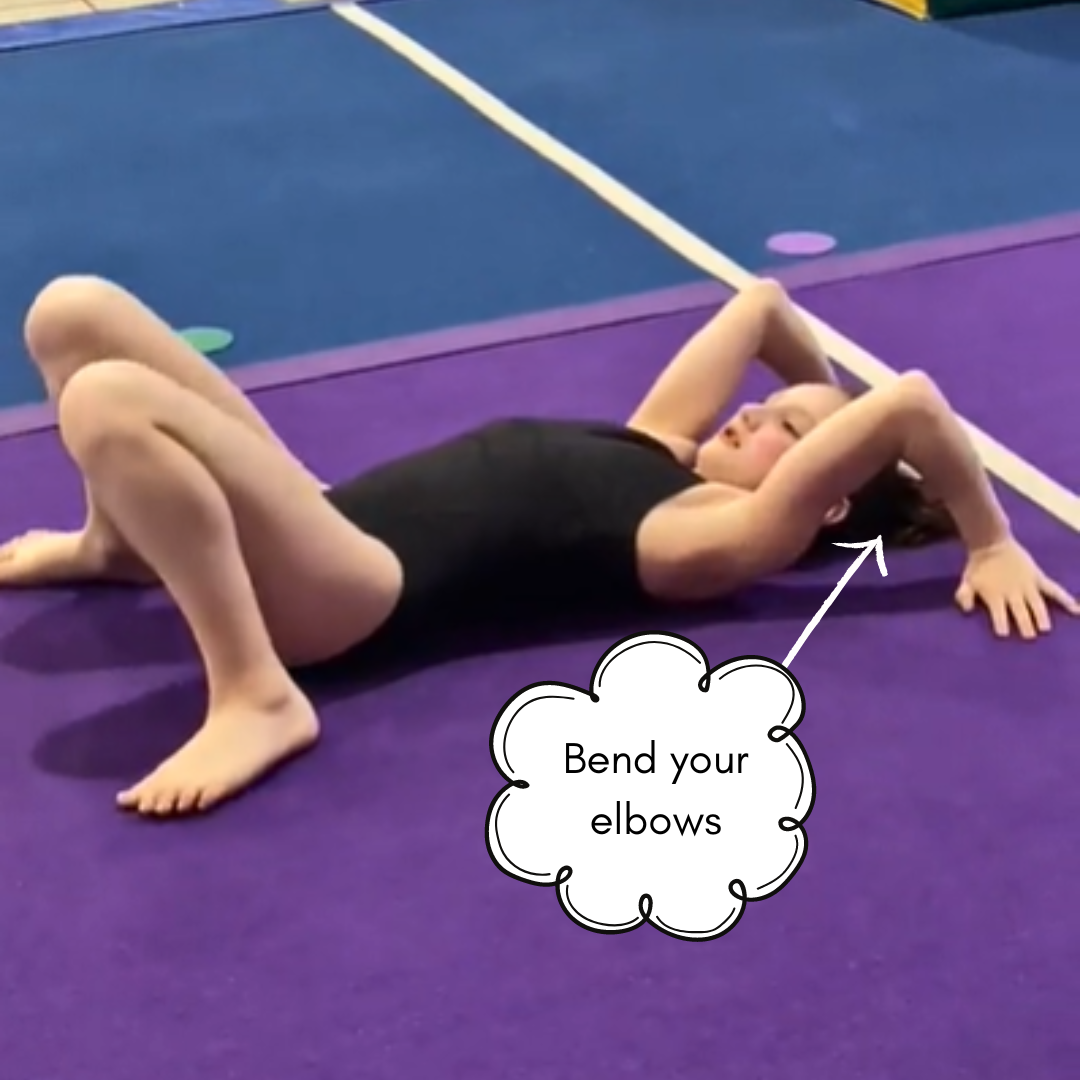 3. Bend your elbows
 4. Place your hands by your ears, flat on the ground
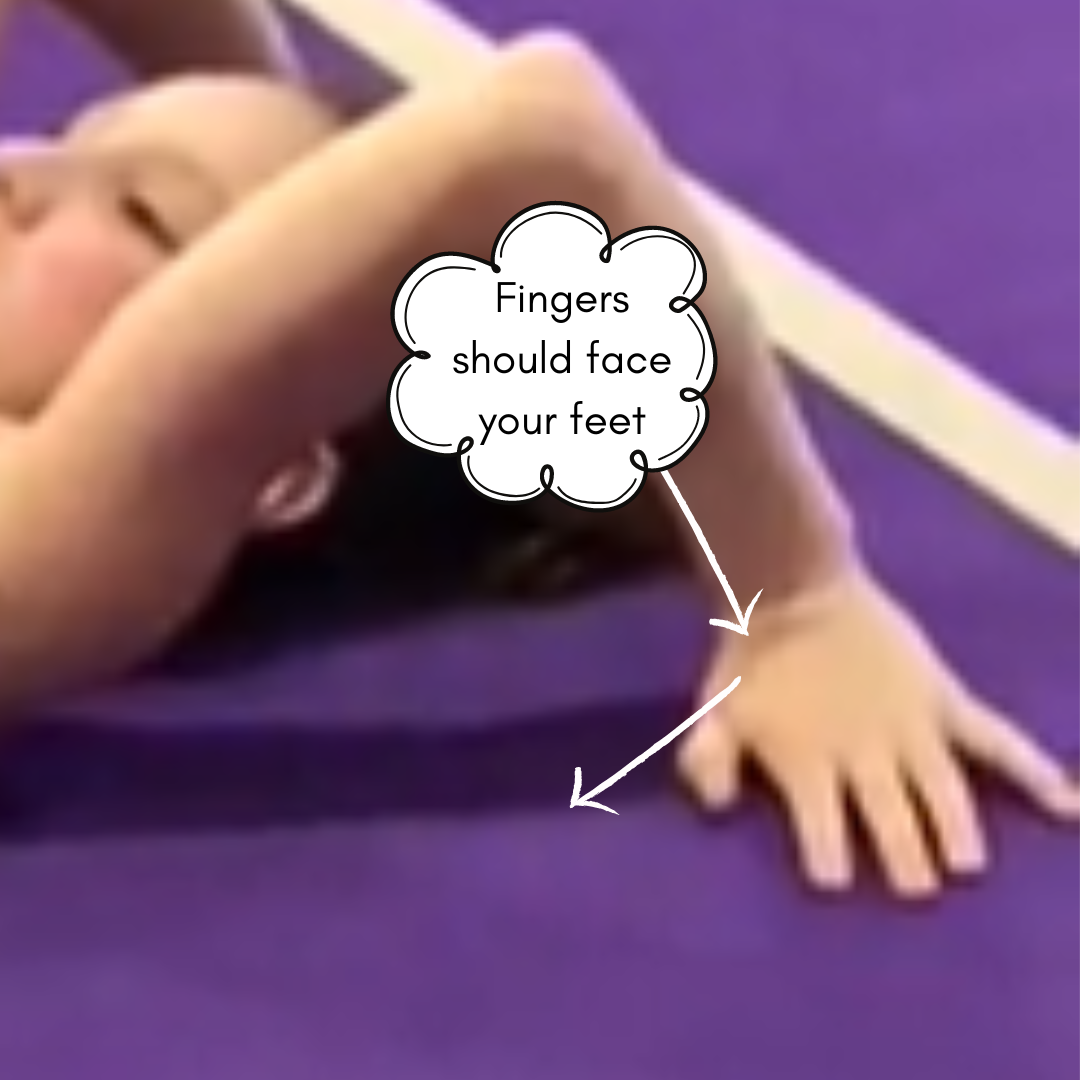 5. Make sure your fingers are facing your feet
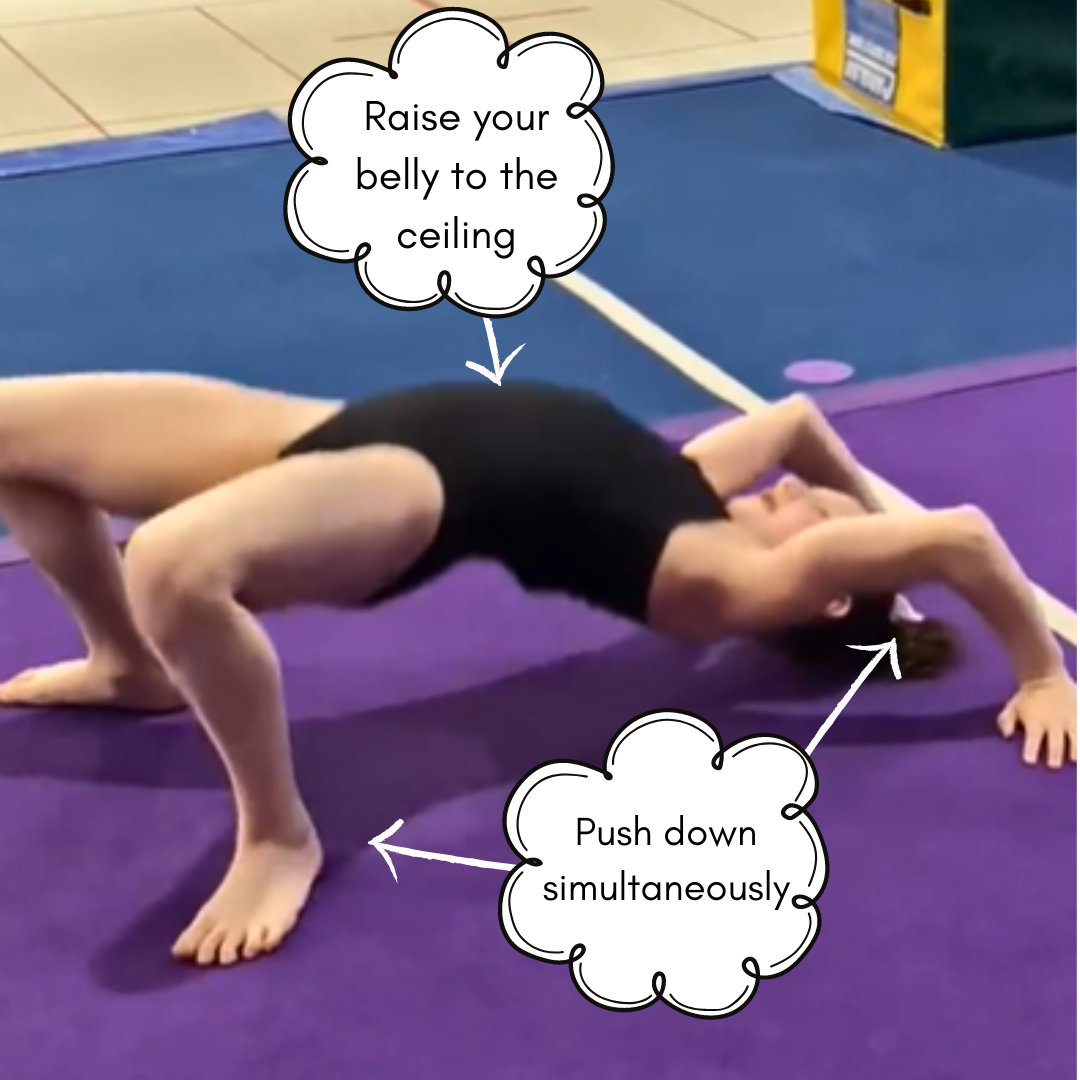 6. Push down simultaneously through your hands and feet while raising your belly up towards the ceiling
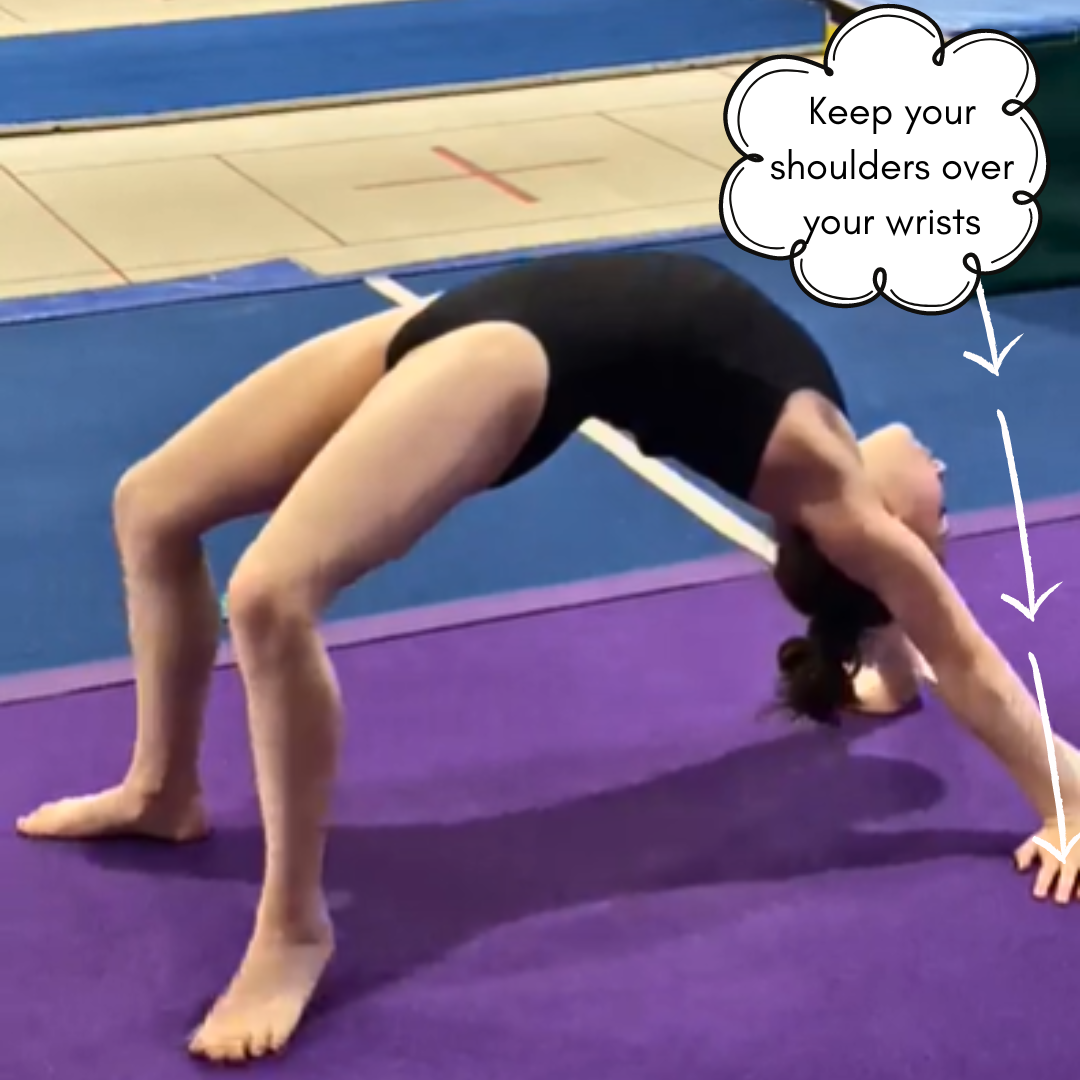 7. Make sure your shoulders are stacked over your wrists
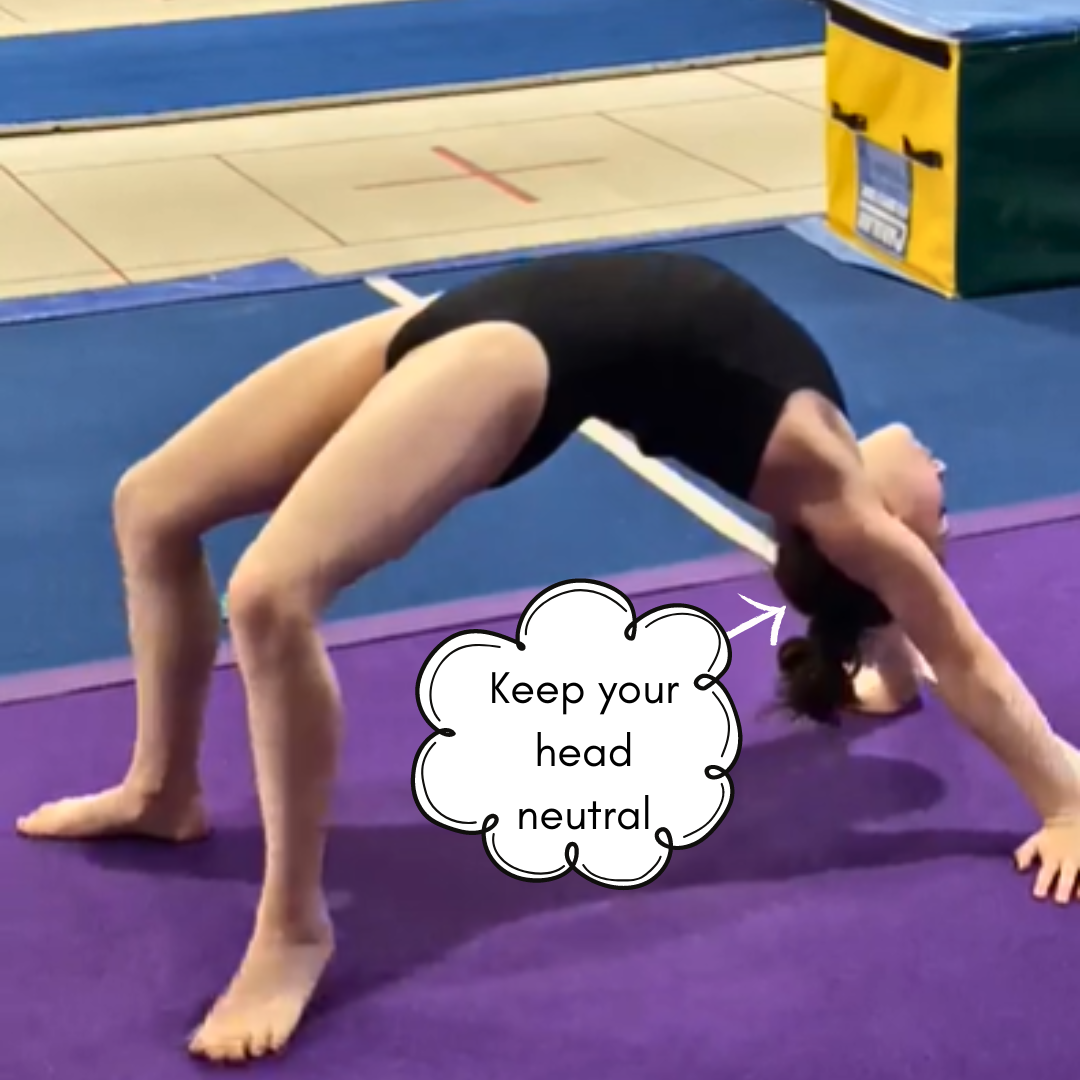 8. Keep head in neutral position – you don’t want your chin on your chest and don’t try to look at your feet or anything
The Muscles & Flexibility You Need for a Bridge
You need shoulder and back flexibility to do a perfect bridge. You need strong legs to push off the floor in the bridge, a strong core to maintain the positioning of the bridge. You need enough upper body strength and flexibility to align your upper body over your wrists for a perfect bridge.
Tips for Learning a Bridge
- Warm Up Properly – always start with a thorough warm-up to prepare your muscles and joints for the bridge. Focus on dynamic stretches for your wrists, shoulders, spine, and hips to increase flexibility and reduce the risk of injury.
- Use Correct Hand Placement – place your hands shoulder-width apart, with fingers pointing towards your feet. This position provides better support and balance, making it easier to push up into the bridge.
- Position Your Feet Correctly – keep your feet hip-width apart and flat on the ground. This stable base helps maintain balance and allows you to push your hips higher.
- Engage Your Shoulders – actively push through your shoulders and extend your arms fully. This engagement lifts your bridge higher and provides a more effective stretch for your back and shoulders.
- Lift Your Hips – focus on lifting your hips towards the ceiling. Engaging your glutes and core muscles helps maintain a high and stable bridge position.
- Maintain a Neutral Head Position – keep your head in a neutral position, looking slightly towards your hands. Avoid pressing your neck into the floor to prevent strain.
- Breathe Deeply – practice deep, controlled breathing while in the bridge. This helps relax your muscles and improves your flexibility, making it easier to hold the position.
- Lower Yourself with Control – when coming out of the bridge, lower yourself slowly and with control. Engage your core and use your arms to gently bring your body back to the floor to avoid injury.
- Practice Consistently – regular practice is key to improving your gymnastics bridge. Incorporate bridge exercises into your routine to build strength, flexibility, and consistency in your form.
- Use a Spotter if Needed – if you’re new to the gymnastics bridge or working on improving your form, consider using a spotter. A spotter can help guide you into the correct position and provide support, ensuring you perform the bridge safely.
- Incorporate Supplemental Exercises – strengthen your core, back, and shoulders with supplemental exercises like planks, push-ups, and shoulder presses. Stronger muscles support better bridge form and stability.
- Stretch Regularly – regularly stretch your back, shoulders, and hips to maintain and improve your flexibility. Incorporate static and dynamic stretches into your routine to keep your muscles pliable and ready for the bridge.
It’s especially important to pay attention to these details for form when you’re first starting out learning a bridge, so that your form will be correct later on. When you are able to do this pretty easily, make sure you put your feet together in the bridge, instead of keeping them wider apart.
Drills to Help You Learn a Bridge
- Bridge on Wedge Mat
- Begin with your feet at the highest part of the mat on your back. With your feet shoulder width apart and your hands by your ears, push up into a bridge. The incline of the wedge mat will make the bridge easier.
- Bridge with Panel Mat
- Place a folded panel mat (folded once initially) place your hands up on the panel mat with your feet on the floor to push up into a bridge.
- Supine Bridge Prep
- Lie on your back with your knees bent and feet flat on the floor, hip-width apart. Place your hands beside your head, fingers pointing towards your shoulders. Press through your feet and hands to lift your hips and shoulders off the ground, coming into a partial bridge.
- Standing Bridge Stretch
- Stand with your feet shoulder-width apart. Place your hands on your lower back for support. Slowly lean back, extending your spine and reaching towards the floor. Go as far as comfortable, then return to standing.
- Partner Assisted Bridge
- Have a partner stand behind you as you attempt a bridge. Place your hands and feet on the ground, and have your partner support your lower back to help you push up into the bridge position. Hold for 5-10 seconds and gently lower down.
- Wall Walk Bridge
- Stand with your back to a wall. Place your hands on the wall at shoulder height. Slowly walk your hands down the wall while bending backward into the bridge position. Walk back up to return to standing. Repeat 3-5 times.
- Bridge Rocks*
- Do a bridge on a wedge mat if you’re still learning a bridge. Rock back and forth trying to get your shoulders over your wrists.
- *To make this an advanced skill once you have learned a bridge and can do it well, do a bridge on the floor and rock back and forth trying to get your shoulders over your wrists.
- BONUS/ADVANCED DRILL: Bridge with Feet on Panel Mat to Kickover
- Do a bridge with your feet up on a folded mat or booster block. Kick over for a bridge kickover.
Check out the home gymnastics equipment we recommend for practicing gymnastics at home. We have linked what we recommend for learning a bridge below.
Tools for Learning a Bridge in Gymnastics |
Description |
Price |
| Panel Mat
|
A panel mat is a helpful tool that provides a softer surface than the floor to learn your bridge so you don’t hurt yourself. | Check Current Price Here |
| Wedge Mat
|
When first learning a bridge it’s useful to do them on a wedge mat. | $217.07 |


Shoulder flexibility and core strength are important in your bridge.
Bridge Progressions
- Bridge
- Bridge Kickover
- Handstand fall to bridge, stand up
- Back Walkover
- Front Walkover
- Back Handspring
- Front Handspring
Common Mistakes to Avoid when Learning a Bridge
- Incorrect hand placement by placing them too far apart or too close to your head – you can correct this by making sure your hands are appropriately spaced by placing your hands shoulder-width apart, directly under your shoulders with fingers pointing towards your feet for better support and balance.
- Foot Positioning by keeping feet too wide or too narrow, or lifting heels off the ground – you can correct this by keeping your feet hip-width apart and flat on the ground to provide a stable base and maintain balance.
- Bent arms with not fully extending your arms, leading to a lower bridge and increased strain on the shoulders – focus on fully straightening your arms and pushing through your shoulders to achieve a higher and more stable bridge.
- Head Position letting your hips drop, which reduces the effectiveness of the stretch and increases lower back strain – correct this by actively pushing your hips upwards, engaging your glutes and core to maintain a high, arching position.
- Lack of Shoulder Engagement not pushing through the shoulders, resulting in a lower bridge and less effective stretch – you need to focus on pushing your shoulders upwards and away from your ears to increase the height and stability of the bridge.
Frequently Asked Questions
How to do a bridge for beginners?
To do a bridge for beginners, start by lying on your back with your feet flat on the ground and your hands by your ears. Press through your hands and feet, lifting your hips off the ground until your body forms a bridge shape. Keep your arms straight and engage your core for stability. Hold this position for a few seconds before gently lowering back down. Remember to breathe and practice regularly to improve your flexibility and strength. Work on improving your back and shoulder flexibility to improve your bridge.
How to do a bridge properly?
To do a bridge properly, focus on form and technique. Start by lying on your back with your feet flat on the ground and your hands by your ears. Press through your hands and feet evenly, lifting your hips off the ground while keeping your arms straight and your core engaged. Avoid arching your back too much or allowing your shoulders to collapse, you want to be pushing through your shoulders. Hold the position with control and come back down slowly. Regular practice will help you perfect your bridge technique.
How to do a bridge for kids?
To teach kids how to do a bridge, start by explaining the basic steps in a fun and interactive way. Encourage them to lie on their backs and lift their hips off the ground while pressing through their hands and feet. Make it a game by adding music or using props to keep them engaged. Provide plenty of positive reinforcement and encouragement as they practice their bridges. Remember to prioritize safety (always have an adult supervision and spot in the beginning!) and ensure they are using proper form to prevent any injuries.
How to do a bridge walk?
To do a bridge walk, start in a bridge position with your hips lifted and arms straight. Slowly walk your hands and feet in small steps, constantly engaging your core to maintain stability. Focus on keeping your body in a straight line and moving with control. This exercise is great for building strength and coordination. Practice regularly to improve your bridge walk and challenge yourself by increasing the distance you walk in each session.
Gymnast: @mayaistumbling

8 Comments